Updated on 30.6.2024
While creating a proper readme for the project, I realized that it can actually be used to control several
cronjobs, I just hadn't used it in that way.
It is somewhat limited by the scrip identifier and by having only three options (schedule 1, schedule 2 or
disabled), but I think these could be resolved in a reasonable amount of time.
If you're interested in a practical implementation, I recommend checking out the GitHub repository.
Back to the original articleI want to have better control over my cronjobs and easily see and access them, instead of frequently editing them manually on my phone through a terminal.
This issue has been largely solved, as there are several projects addressing it:
-
Webmin
Unix administration tool -
Cronicle
Task scheduler and runner -
crontab-ui
Add/delete/manage cronjobs
The thing is, I don't want anything extra on my Raspberry Pi and all of these solutions are a bit too heavy.
My need is also very specific; I want to be able to select on a day-by-day basis whether my cronjob runs at
timer 1, timer 2, or not at all.
I've shared the project files in a GitHub repository.
Where to start
Initially, I considered using bash and aliases to manage the cronjobs. However, this approach would still necessitate using the terminal on my phone, something I want to avoid as much as possible. I've been using JuiceSSH to control my Raspberry Pi, but writing terminal commands on a phone is not very fun.
So, the logical solution would be to host a local website and to use a UI to control the cronjob. For this purpose, I plan to use Python and Flask, as they are easy to use and I already have some experience with them. This led me to Python Crontab, because I would be using Python anyway.
For small and simple projects, Python is always a versatile and great choice. Flask continues this trend, as it's lightweight and really easy to deploy and setup.
Utilizing ChatGPT
I don't really enjoy the initial html and css part of creating a new site, so to save me some time and have the basics ready I will be using ChatGPT to generate the basic structure. This is the prompt that I used:
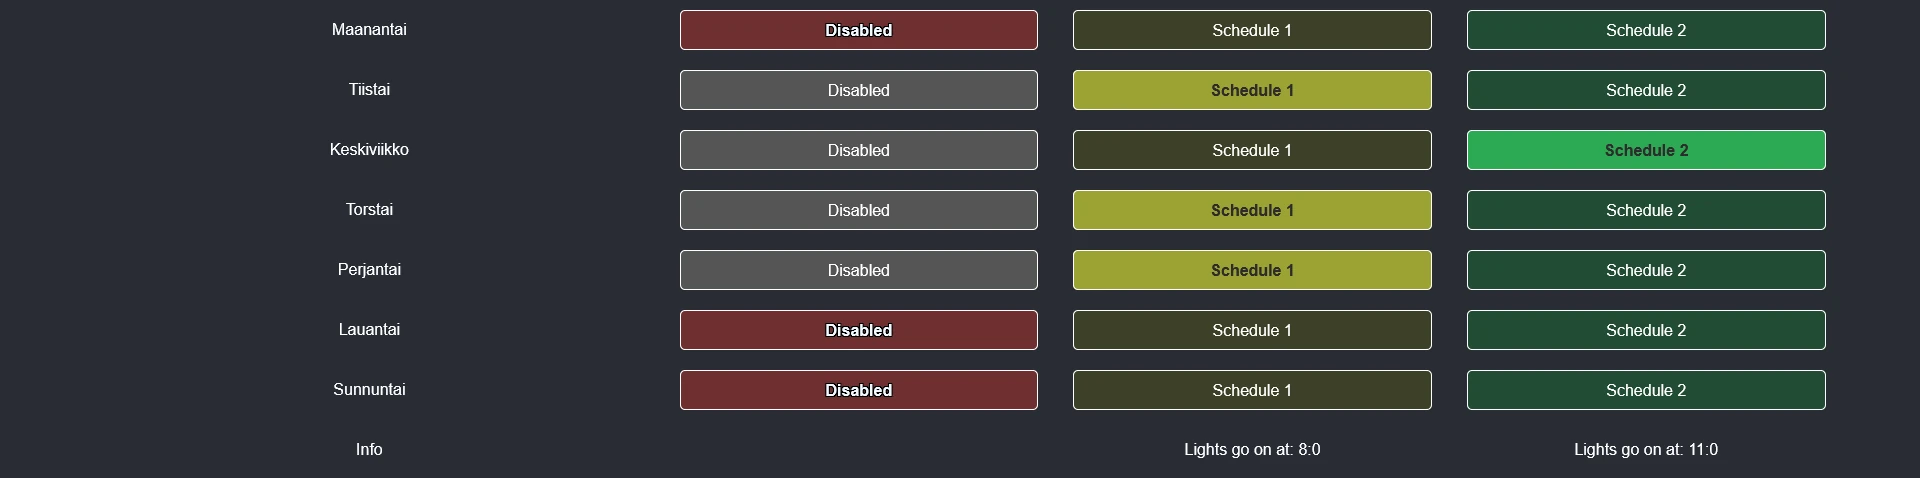
Create html and css files with the following parameters

The site should have 7 rows with 4 columns

The rows represent a single weekday Populate the columns with the following parameters:
1. Name of the column, e.g. weekday
2. Disabled
3. Schedule 1
4. Contains a description for the schedule
5. Schedule 2
6. Contains a description for the schedule

For each row, only one of the options should be selected. By default use disabled state, but change the selection when clicking other options.

The selection should be indicated by changing the color of the buttons

The theme should be eye friendly (dark) and will be used primarily from mobile devices, so account for that
While this gave me a starting point, the site does not look the way I'd like it to. The colors are not great, it's missing the descriptions and it does not have any margins. It did give me a JavaScript file that ensures that only 1 selection can be active at a time per row, which is nice.
After some tweaking, I like the look a bit more. I mostly made changes to the styles.css file, adding margins and new class combinations for selected values to get the colors correct. To the html I added a new row below the table, that contains the descriptions.
Explaining the configurations
This time, I decided to make the code more flexible, by using a separate configuration file. This file overrides the default configurations, if it exists. This way we can rename things easily depending on the purpose and handle localization. Using configurations also makes maintaining and changing things easier later or, as we'll only need to change them in a single place.
To override the config_example.py you must create a config.py file to the root and override all of the defined values. You can copy the config_example.py contents to a new file and input the new values.
I've included some explanation comments on the config_example.py-file.
Getting the data
Now that we have the initial page setup complete, we can setup flask and start putting together the cronjob controls.
The next step is getting the current cronjob states with Python Crontab and showing them on the UI.
We need to install Python Crontab and Croniter, which Python Crontab depends on:
pip install python-crontab
pip install croniter
With Python Crontab active, we can finally get the data from the cronjobs:
# Get user crons for the configured user
cron = CronTab(user=app.config['USER'])
cron_data = {}

for job in cron:
	# Script identifier is used to fetch only certain cronjobs and it is configured in the config.py file
	if app.config['SCRIPT_IDENTIFIER'] in job.command:
		cron_data[job.comment] = {
			'job': job,
			'selected_option': calculate_selected_option(job)
		}

# Check when the job is run and set the current schedule based on that
def calculate_selected_option(job):
    if not job.is_enabled():
        return app.config['DISABLED']
    hour = str(job.hour)
    minute = str(job.minute)
    if hour.isdigit() and int(hour) == app.config['SCHEDULE_1_HOUR']:
        if minute.isdigit() and int(minute) == app.config['SCHEDULE_1_MINUTE']:
            return app.config['SCHEDULE_1']
    if hour.isdigit() and int(hour) == app.config['SCHEDULE_2_HOUR']:
        if minute.isdigit() and int(minute) == app.config['SCHEDULE_2_MINUTE']:
            return app.config['SCHEDULE_2']
    # If no schedule matches and the job is active it will not be highlighted on the UI
    return 'No match'
To the populate the values to the UI, we will use a dictionary and a for loop with flask and adding a separate row for description fields below. We'll pre select the correct option based on the logic on the previous snippet.
    <div class="container">
	    <!-- For each item in cron_data, we create a set of rows -->
        {% for key, value in cron_data.items() %}
            <div class="row">
                <div class="cell title">{{ key }}</div>
                <div class="cell button disabled {{ 'selected' if cron_data[key]['selected_option'] == config['DISABLED'] else '' }}"
                onclick="selectOption(this, '{{ key }}', 'disable')">{{ config['DISABLED'] }}</div>
                <div class="cell button option1 {{ 'selected' if cron_data[key]['selected_option'] == config['SCHEDULE_1'] else '' }}"
                onclick="selectOption(this, '{{ key }}', '{{ config['SCHEDULE_1'] }}')">{{ config['SCHEDULE_1'] }}</div>
                <div class="cell button option2 {{ 'selected' if cron_data[key]['selected_option'] == config['SCHEDULE_2'] else '' }}"
                onclick="selectOption(this, '{{ key }}', '{{ config['SCHEDULE_2'] }}')">{{ config['SCHEDULE_2'] }}</div>
            </div>
        {% endfor %}
        <div class="row">
            <div class="cell title">Info</div>
            <div class="cell"></div>
            <div class="cell">{{ config['SCHEDULE_DESCRIPTION'] }} {{ config['SCHEDULE_1_HOUR'] }}:{{ config['SCHEDULE_1_MINUTE'] }}</div>
            <div class="cell">{{ config['SCHEDULE_DESCRIPTION'] }} {{ config['SCHEDULE_2_HOUR'] }}:{{ config['SCHEDULE_2_MINUTE'] }}</div>
        </div>
    </div>
Updating the cronjobs
Of course, we also want to update the cronjobs from the interface. To do this, we will implement update and disable endpoints to the Flask application.
Update
When we switch the schedule from the UI, we must find the correct cronjob, update it and set it active in case it wasn't.
@app.route('/update_cron', methods=['POST'])
def update_cron():
    data = request.json
    job_comment = data.get('job_comment')
    schedule = data.get('schedule')

    cron = CronTab(user=app.config['USER'])
    for job in cron:
        if app.config['SCRIPT_IDENTIFIER'] in job.command and job.comment == job_comment:
            day_of_week = job.dow
            job.enable()
            if schedule == app.config['SCHEDULE_1']:
                job.setall(f'{app.config["SCHEDULE_1_MINUTE"]} {app.config["SCHEDULE_1_HOUR"]} * * {day_of_week}')
            else:
                job.setall(f'{app.config["SCHEDULE_2_MINUTE"]} {app.config["SCHEDULE_2_HOUR"]} * * {day_of_week}')
            cron.write()
            return jsonify({'status': 'success', 'message': 'Cron job updated: ' + job_comment})
    return jsonify({'status': 'error', 'message': 'Cron job not found.'})
Disable
To disable a job, we can just disable and persist the changes. Disabling a job with Python Cronjob means that the cronjob is commented out.
@app.route('/disable_cron', methods=['POST'])
def disable_cron():
    data = request.json
    job_comment = data.get('job_comment')

    cron = CronTab(user=app.config['USER'])
    for job in cron:
        if app.config['SCRIPT_IDENTIFIER'] in job.command and job.comment == job_comment:
            job.enable(False)
            cron.write()
            return jsonify({'status': 'success', 'message': 'Cron job disabled: ' + job_comment})
    return jsonify({'status': 'error', 'message': 'Cron job not found.'})
Conclusion
With these features we have created a simple website, where we can clearly and easily control cronjobs.
This could of course be altered to be more flexible, supporting several different script types, giving more schedule options or configuring the scheduler options through the site itself.
But this will be enough for me. You can check out the full project at GitHub.